Schedules
Schedules in Actual are a versatile tool designed to help you stay on top of your finances by supporting planning and automation.
Schedules are a powerful planning tool that helps you stay ahead of your finances. Many users rely on them to anticipate upcoming expenses, avoid missed payments, and ensure money is available where it's needed. While they also automate recurring transactions to keep your budget accurate and save time, their real strength lies in helping you prepare for what's ahead.
You can set schedules to recur on specific dates or frequencies and tailor them to fit your unique budgeting needs. Whether you're creating them from scratch or existing transactions, schedules can also be linked to rules to categorize and annotate entries automatically.
By combining automation with proactive planning, schedules enable you to maintain control over your budget and avoid unexpected surprises.
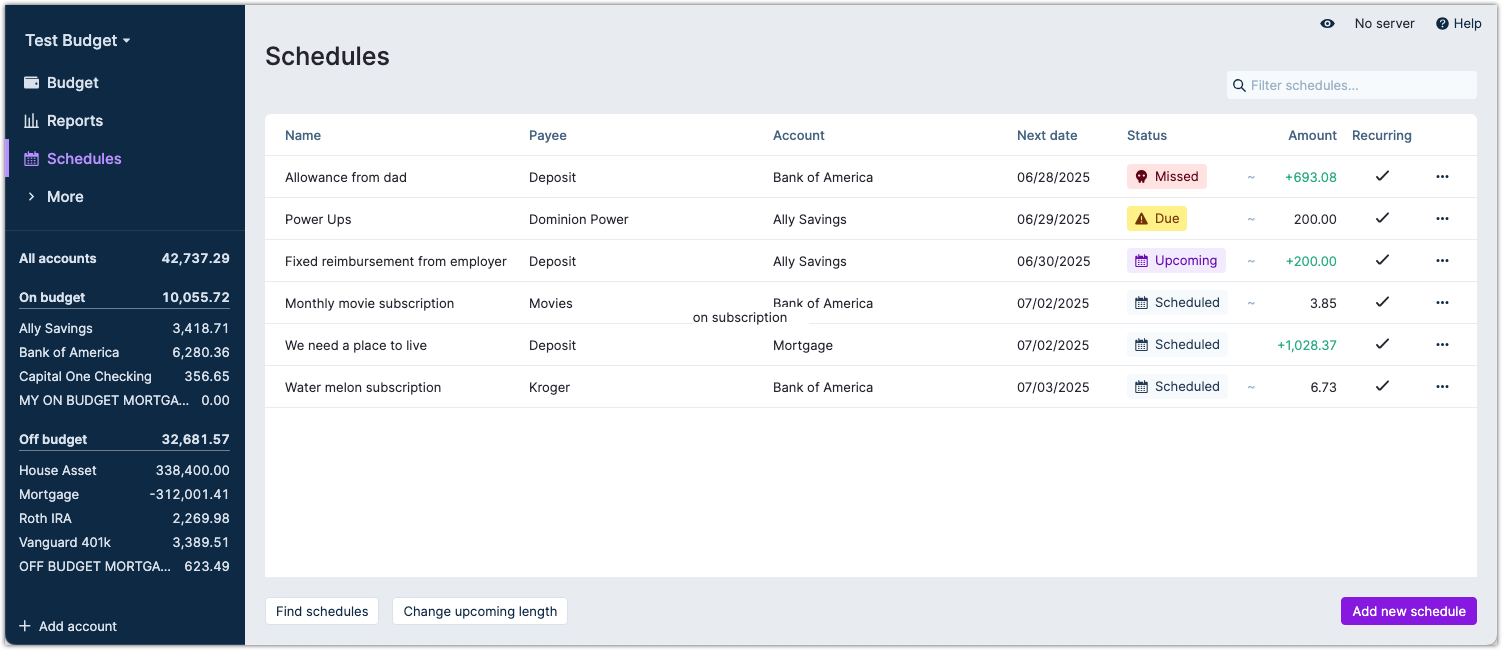
The Schedules Overview Screen
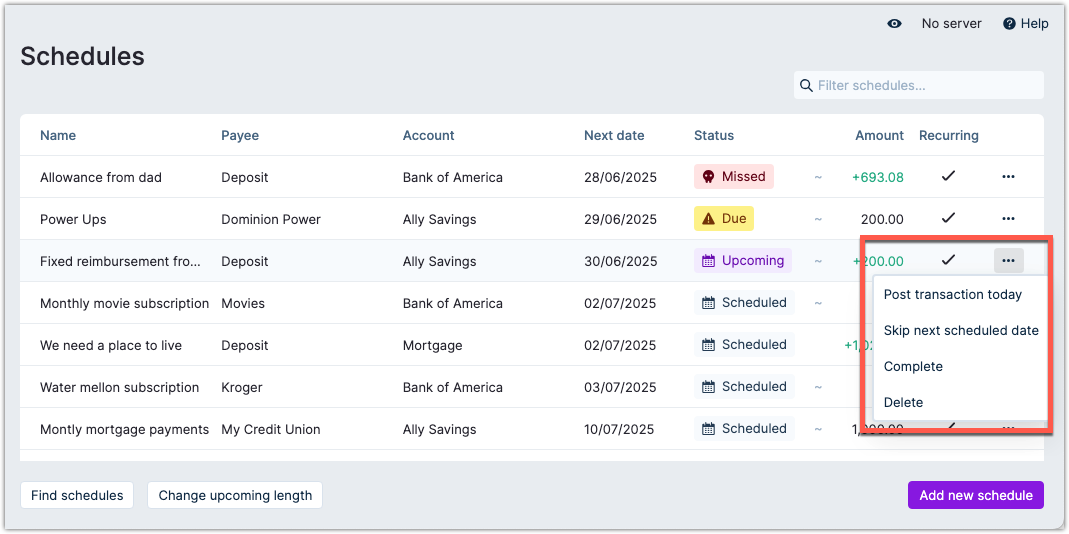
Most of the columns in the Schedules overview screen are self-explanatory.
However, if there is ~ (tilde) in front of the Amount column, it indicates that the amount is an approximate value. This is useful for transactions that may vary slightly each time, such as utility bills or subscriptions that change based on usage.
See Creating a Schedule for more information on how to set up approximate amounts.
What are Schedules?
Schedules can be used to enter anticipated transactions early. These transactions can be recurring or one-time. Schedules allow you to set up a transaction that will be automatically entered into your account register on a specified date or at a specified frequency. This is particularly useful for bills, subscriptions, and other regular expenses that you want to track without having to enter them manually each time.
Schedules can also be used for income, such as paychecks or other regular payments. By scheduling these transactions, you can ensure that your budget accurately reflects your expected income and expenses.
Schedules can be set to recur on a specific day of the month, such as the 1st or the 15th, or they can be set to recur every week, every two weeks, or at other intervals. You can also choose to have the schedule automatically enter the transaction into your account register or to approve each entry manually.
Schedules can also be used to link transactions together, making it easy to track related expenses and income. For example, suppose you have a mortgage payment that is automatically deducted from your bank account each month. In that case, you can create a schedule for that payment and link it to the corresponding transaction in your budget. Schedules can be created from scratch or existing transactions, and they can be customized to fit your specific needs. You can also use rules to automatically categorize and add notes to scheduled transactions, making it easier to keep track of your budget.
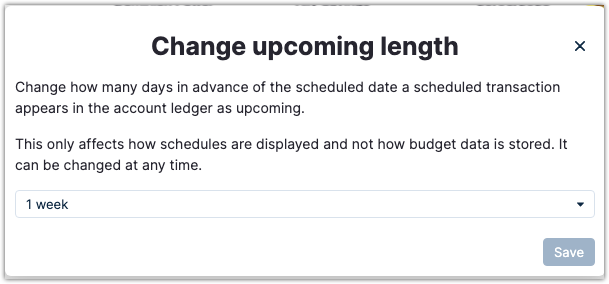
Adjusting the Upcoming Length of Schedules
You can control how far in advance scheduled transactions appear in the Schedule and Account register views as upcoming. This setting determines the number of days before the scheduled date that a transaction will be displayed as upcoming in the account ledger, helping you plan and avoid surprises.
For example, in the image at the top of this page, the upcoming length is set to End of the current month.
By clicking on the Change upcoming length button, you can select how far in advance you want to see forthcoming transactions (e.g., 1 day, 1 week, 2 weeks, 1 month, End of the current month, or Custom length).
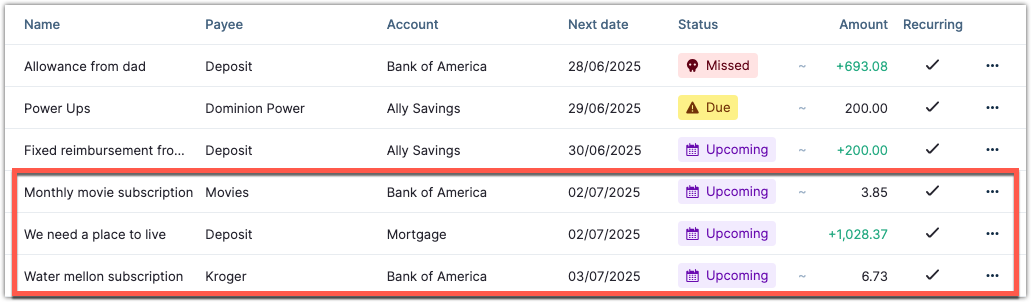
If you change the upcoming length to 1 week, only transactions scheduled within the next week will appear as forthcoming. The Monthly movie subscription, the Mortgage, and the Water melon subscription will now show as upcoming transactions.
This flexibility allows you to customize your view — whether you want to see all upcoming transactions for the month or just those in the immediate future. Adjusting the upcoming length can help you focus on the most relevant transactions and keep your budget organized.
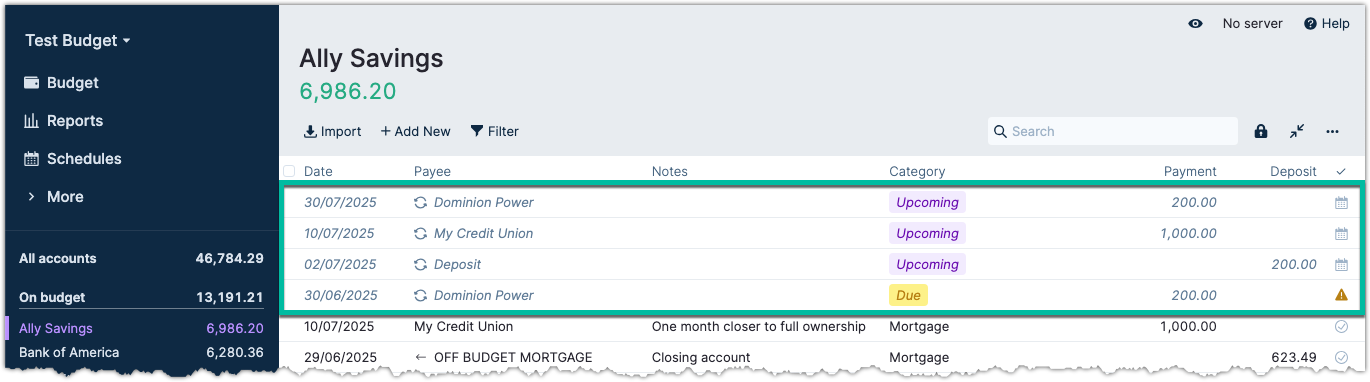
Changing the upcoming length only affects how schedules are displayed in your ledger; it does not impact how your budget data is stored or calculated. You can adjust this setting at any time to fit your preferences. If we change the upcoming length to 1 month the Account register will also reflect this change:
Creating a Schedule
Clicking on the Add new schedule button in the bottom right of the Schedules screen will add a new schedule.
Some of the available options to tailor schedules to your needs are:
- Set to be recurring or only entered once
- Set to be automatically entered into the account register or choose to manually approve entries
- Options for recurring entries for multiple specific days of the month. a. A single schedule can be created for a Cell phone plan that has multiple users and different payment cycles for each phone. If you have 3 cell phones that all get paid on different days of the month, each day can be defined in a single schedule for each phone.
- Options to determine frequency of payments, such as every month, every 2 months, every 2 years, etc. a. "Last" day of month can be selected by selecting "Add specific days", and selecting "Last" from the day drop-down list. c. If you select 31st, approximately every other month will be skipped.
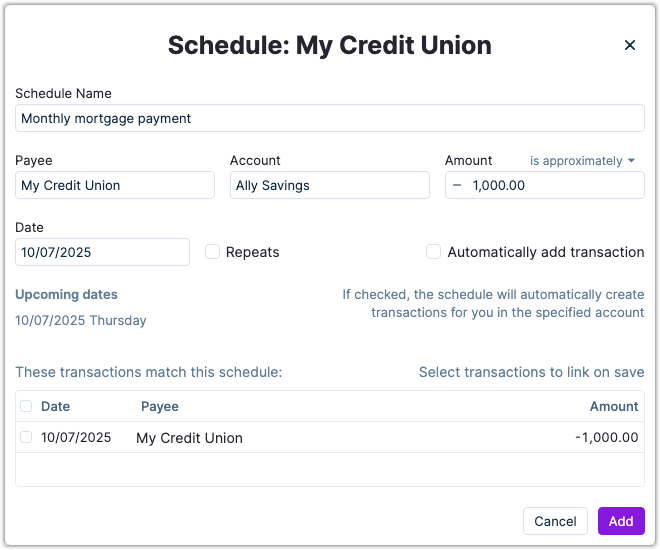
The example above shows a mortgage payment schedule which is to be executed on the 10th of July. Since a mortgage payment is a recurring transaction, the Repeats checkbox should be enabled. By enabling Repeats the Date field now let you enter a frequency for your transaction. You can also enter more than one date by hitting the + button next to the date field. This is useful for transactions that occur on multiple days of the month, such as a bi-weekly payments.
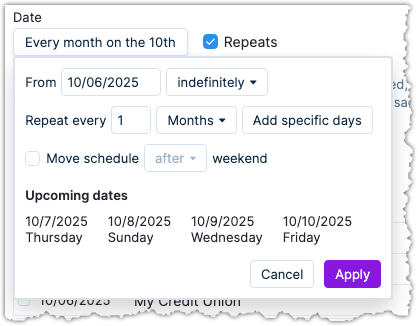
The Move schedule checkbox allows you to move the schedule either to before of after a weekend, if the selected date falls on a weekend.
Schedules do not account for holidays.
The Amount field allows you to enter the amount of the transaction.
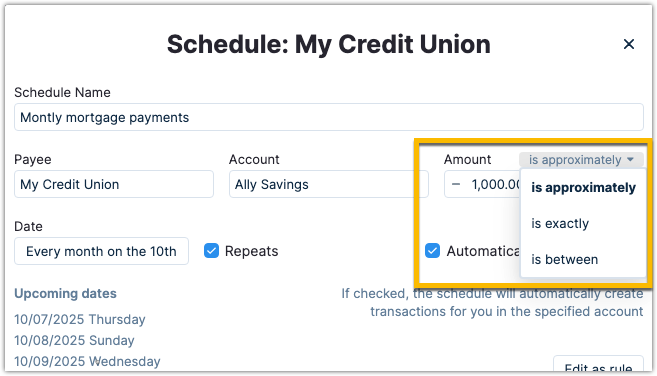
Next to the amount field, you can select if the amount is the exact number, an approximate value, or a range between two amounts. This is useful if you want to track a range of expected amounts for a transaction, such as a utility bill that may vary slightly each month.
If you choose is approximately, the amount will be treated as an estimate, and Actual will match transactions that are plus/minus 7.5% of the amount entered. This means that if you enter $100, Actual will match transactions that are between $92.50 and $107.50.
Enable the Automatically add transaction checkbox if you want the schedule to automatically enter the transaction into your account register. This means that the transaction will be automatically entered into the account register on all scheduled dates without requiring manual approval.
It may also be useful to link the schedule to transactions.

Once a schedule is started, Actual will search the transaction history for entries that match the schedule. You can then select the matches, and will have the option to link those transactions to the current schedule. You can click on the Find matching transactions button to have Actual look for matches.
Let Actual Find Scheduled Transactions
Instead of manually entering each schedule, you can let Actual find and suggest schedules for you.
Click the Find schedules button in the bottom left corner of the Schedules page to let Actual automatically search for transactions that appear to be recurring.
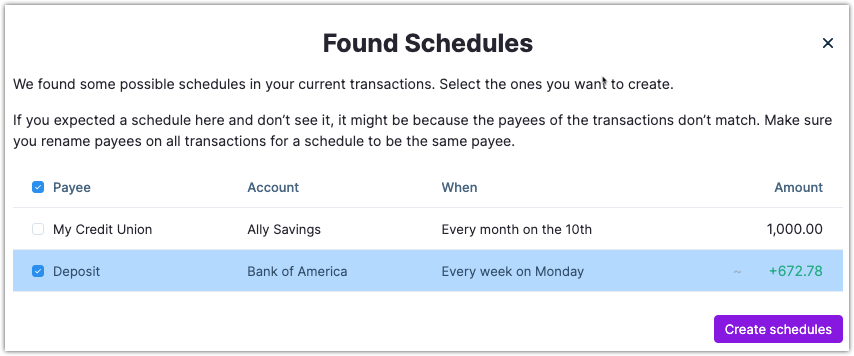
Select the suggested schedules you want to add, and click the Create schedule button. Actual will then create schedules based on the selected transactions. You may need to adjust the dates and other settings for the schedules to fit your needs after they have been created.
If a schedule you expect does not appear, it may be because the payees on the transactions do not match. Ensure all transactions for a schedule use the same payee name.
Creating Schedules From Transactions
You can also create a schedule from an existing transaction. This is useful if you have a transaction that you want to turn into a schedule, such as a recurring bill or income.
Navigate to the Accounts page, find the transaction you wish to create a schedule from.
- Select the tick box in the left hand column for the transaction you wish to copy.
- Once selected, go to the drop-down menu on the top right of the page.
- Click on Link schedule.
In the Pop up that appears click "Create New"
You are now presented with the same dialog as when creating a new schedule from scratch. All fields will populate from the transaction, Adjust any additional fields, and then click Add.
Managing Schedules
Once you have created a schedule, you can edit it by clicking on the schedule line in the Schedules view. This will open the Schedule Details dialogue, where you can edit the schedule.
If you click on the ellipsis at the end of the schedule line, you will see various options to manage the schedule.
How Actual Finds Schedules
In addition to the requirements you have specified when creating a schedule, a transaction must also meet the date requirements to be matched to a schedule. Transactions must be dated within 2 days before or after the scheduled date.
For example, you have a schedule set up for your power bill to be paid on the 15th of every month. Today is the 10th of the month, and you can see an upcoming scheduled transaction of your bill in Actual. The utility company decided to withdraw the funds on the 10th of this month. Therefore, post the transaction to Actual early and update the transaction date to match your bank statement.
A problem has occurred because the posted transaction is now outside the 2-day window to match scheduled transactions. You'll see your bill posted in the Actual account ledger, but you'll also see an upcoming transaction for the power bill on the 15th, even though you just entered it. This is the expected behaviour when using schedules.
You can resolve this issue in one of two ways.
- Skip the next schedule by selecting the upcoming scheduled transaction and choosing the "Skip Scheduled Date" from the menu options.
- Accept that the date doesn't match and leave it as is so the schedule doesn't prompt a second transaction.
How To Use Rules With Schedules
Many times it's desired to add notes to the scheduled transactions or to assign categories automatically. This is done with the Rules tool. The tool can be reached directly from the Schedules page by clicking on the Edit as a rule button in the edit dialog of a schedule.
When you edit a schedule, the Edit as rule button will appear in the dialog
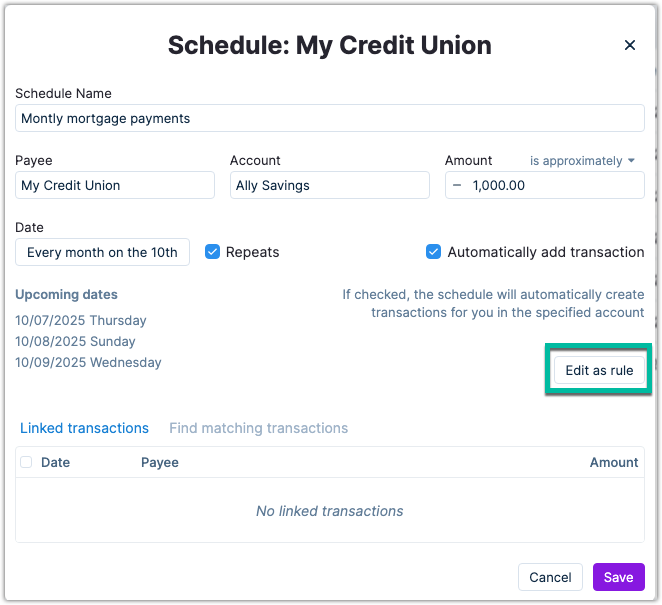
Click on Edit as Rule to further customize the automatic entry.
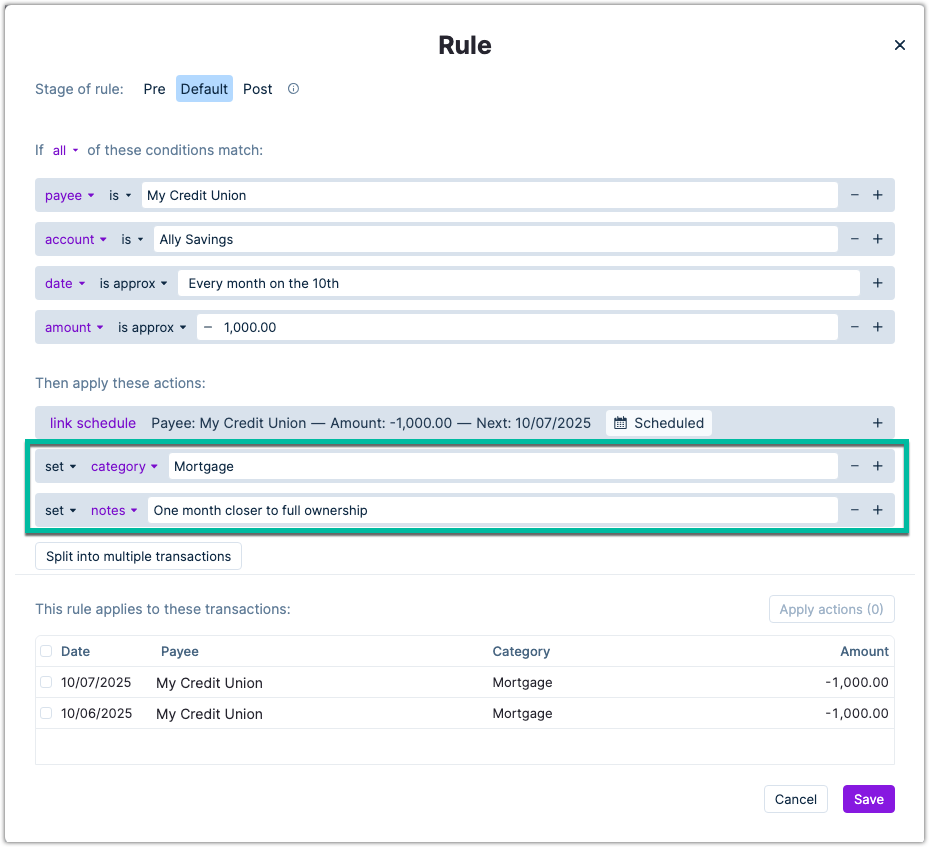
We can see that the rule is already populated with the information from the schedule. The If these conditions are met area will have the date and frequency of the schedule, as well as the account it is linked to. The only thing you would like to add is the category and notes for the transaction.
Next you can select all the matching transactions that you want to apply this rule to. This is done by clicking on the checkbox next to the Date header. Then click on the Apply actions button in the dialog.
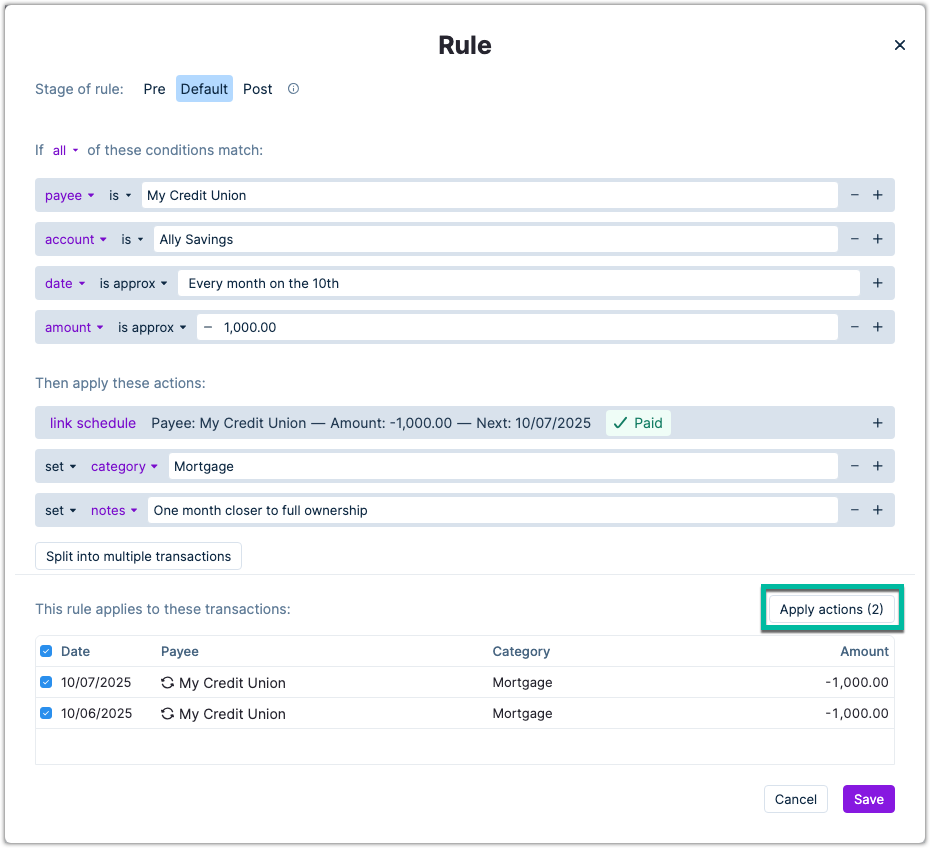
Save the rule and any time this scheduled transaction gets entered into the register it can be automatically categorized with a helpful note.